








-50x50.png "ClearWhite GlassRestore Pro | Polish Cermin Kereta | Car Glass Polish Watermark and Water Spot Remover | Polish Cermin Hadapan | Kesan Wiper")


How Baby Bottle Sanitizers Simplify Feedings
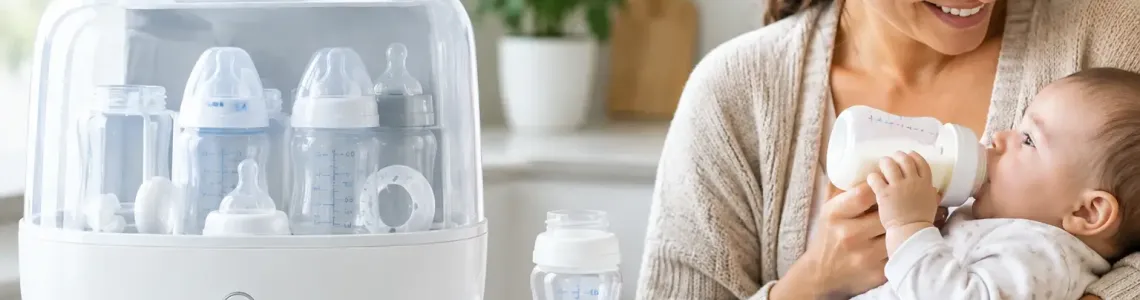
A bottle can look clean and still have milk film tucked beneath the nipple ring, inside the collar, or along the threads. That is why baby bottle sanitizers appeal to busy parents: they add a reliable hygiene step after washing, without turning every feeding into a kitchen project.
The right choice is not always the biggest machine or the most expensive setup. It is the sanitizer that fits your bottle system, your counter space, and the number of feeds you handle each day. Start with clean bottles, follow the manufacturer’s instructions, and choose a method you can use consistently.
What Baby Bottle Sanitizers Actually Do
Sanitizing reduces germs on feeding equipment after it has been thoroughly washed. It is different from cleaning. Washing removes visible milk residue, oils, and formula buildup. Sanitizing provides an added level of germ reduction on bottles, nipples, rings, caps, pump parts, and other feeding accessories that are approved for the method you use.
That distinction matters. A steam or UV unit cannot work its best on a bottle that still has dried formula inside it. Think of sanitizing as the final protection step, not a shortcut around washing.
You may also see the word “sterilize” used in product descriptions. In everyday shopping, the terms are often used loosely. What matters most is the product’s stated function, the cycle instructions, and whether your bottle components are compatible with that method. Check your bottle and breast pump manuals before putting parts into high heat, steam, boiling water, or UV equipment.
For many healthy, full-term babies, careful washing in hot, soapy water and proper drying may be enough for routine feeding equipment care. Extra sanitizing can be especially useful during a baby’s early months, after illness, when a water source is uncertain, or when a healthcare professional recommends it. Families caring for premature babies or babies with immune concerns should ask their pediatrician about the best routine.
Clean First, Then Sanitize
A dependable bottle routine begins immediately after a feed. Rinse the bottle, nipple, collar, and cap before milk residue dries. Take every piece apart, then wash using a bottle brush reserved for feeding equipment. Pay attention to the inside of nipples and narrow grooves where residue can hide.
Use warm, soapy water in a clean wash basin, or place dishwasher-safe pieces in the dishwasher according to the bottle manufacturer’s directions. Avoid washing baby feeding parts directly in a dirty kitchen sink where food scraps and greasy cookware may be sitting.
Once washed, rinse thoroughly and move on to sanitizing if it is part of your routine. Afterward, let the pieces air-dry completely on a clean drying rack or towel. Do not wipe them dry with a kitchen towel. Even a fresh-looking towel can transfer bacteria, lint, or food residue back onto the parts you just cleaned.
Types of Baby Bottle Sanitizers
The best option depends on how many bottles you wash, how quickly you need them back in rotation, and whether you want one appliance to dry as well as sanitize.
Electric steam sanitizers
Electric steam sanitizers use high-temperature steam inside a countertop chamber. They are a strong fit for households washing several bottles a day because many models hold multiple bottles, nipples, and accessories at once. Some also include a drying cycle, which is a major convenience when you do not want clean parts taking over your counter for hours.
The trade-off is size. These units need counter space, an outlet, and regular descaling if your water leaves mineral deposits. Follow the fill line exactly and do not overload the rack. Steam needs room to circulate around each item.
Microwave steam sanitizers
Microwave units are compact containers that use water and microwave heat to create steam. They are often less expensive than electric countertop models and can work well in smaller kitchens. They also make a practical backup for travel if you know you will have microwave access.
Capacity is usually more limited, and timing varies by microwave wattage. Use only microwave-safe bottle parts and allow the container to cool before opening it. Steam burns are a real risk when lids are lifted too quickly.
UV sanitizers
UV sanitizers use ultraviolet light rather than steam. Their main advantage is that they do not use water, so there is no hot steam, wet chamber, or mineral buildup. Some parents prefer them for dry items such as pacifiers and certain electronic accessories that cannot be immersed in water.
UV units need clean, dry items and clear light exposure. Shadows, stacked parts, cloudy surfaces, or residue can limit results. They can also cost more upfront, so they make the most sense when their specific convenience solves a real problem in your routine.
Boiling water and dishwasher options
You do not always need a dedicated appliance. Boiling is a simple heat-based method when bottle components are approved for it. A dishwasher with a sanitizing setting can also be useful for dishwasher-safe bottles and parts. Both options can save money, although boiling requires close attention to timing and can wear some materials faster over repeated use.
Always check compatibility first. Heat can warp certain plastics, damage printed measurement markings, or shorten the life of silicone and valve components. If a part is not clearly approved for your chosen method, use the safer option recommended by its manufacturer.
When a Sanitizer Is Worth the Counter Space
A sanitizer earns its place when it removes friction from a task you already need to do. If you are washing eight bottles a day, pumping regularly, or preparing bottles for overnight feeds, a larger steam-and-dry unit can reduce the pileup fast. It can also help keep clean parts contained instead of scattered across the kitchen.
On the other hand, a parent using one or two bottles a day may be perfectly happy with a microwave unit, dishwasher method, or careful boiling routine. Buying a large appliance “just in case” can mean one more bulky item collecting dust.
Look at your feeding pattern honestly. Combination-feeding families, exclusive pumpers, daycare households, and parents of twins often benefit from bigger capacity. For occasional bottle use, speed and storage may matter more than capacity.
What to Check Before You Buy
Do not choose based on a label alone. A practical sanitizer should make your routine easier without creating new compatibility or cleanup problems. Compare these details before adding one to your cart:
- Capacity: Count the bottles and accessories you usually wash between loads, not the maximum number you own.
- Drying function: A sanitize-and-dry cycle can be valuable in humid homes or busy feeding schedules.
- Bottle compatibility: Confirm that it fits your bottle height, wide-neck design, nipples, pump parts, and pacifiers.
- Cycle time: A fast cycle is useful, but cooling and drying time also affect how soon parts are ready to use.
- Cleaning needs: Steam units may need descaling, while UV units need clean bulbs or internal surfaces for consistent performance.
Also consider the storage situation. Some units keep sanitized contents enclosed after the cycle, which can be helpful if you need to prep bottles before bed. Others are better for immediate use but still require you to move dry parts to a clean cabinet or covered container.
A Simple Routine That Stays Manageable
Make the routine easy enough for anyone in the household to follow. Wash bottles after feeds when possible, collect clean parts in one designated drying area, and run the sanitizer at a predictable time - after the morning bottle rush or before bed, for example.
If your sanitizer includes a drying cycle, avoid opening it repeatedly during the process. Once everything is dry, handle parts with clean hands and assemble bottles only when you are ready. Store bottles with clean caps on or in a clean, covered space so dust and kitchen splatter do not undo your work.
Do not forget the sanitizer itself. Empty standing water after use when the instructions call for it, wipe down the chamber, and descale a steam unit on schedule. A machine that smells stale or shows mineral buildup needs attention before the next cycle.
Common Questions About Baby Bottle Sanitizers
Do I need to sanitize after every bottle?
Not always. The right frequency depends on your baby’s age, health needs, water quality, and your pediatrician’s guidance. Many parents sanitize once a day after washing all used feeding parts, while others sanitize more often in the early weeks or after illness.
Can I sanitize bottles that still have milk residue?
No. Wash first. Sanitizing is designed to reduce germs on clean surfaces, not remove formula, breast milk fat, or dried residue. A bottle brush and thorough rinse remain essential.
Can I put every baby item in a sanitizer?
Only if the item’s manufacturer says it is safe for that specific method. Bottles may be steam-safe while a pump valve, teether, or electronic accessory is not. When in doubt, check the care label before exposing it to heat, steam, or UV light.
A bottle sanitizer should give you one thing back: breathing room. Choose the setup that keeps clean feeding gear ready without making your kitchen routine harder, then let consistency do the heavy lifting.