









-50x50.png "ClearWhite GlassRestore Pro | Polish Cermin Kereta | Car Glass Polish Watermark and Water Spot Remover | Polish Cermin Hadapan | Kesan Wiper")


Robot Mop Maintenance That Keeps Floors Cleaner
A robot mop can make daily floor care feel almost effortless - until it starts leaving gray streaks, smelling damp, or returning to the dock with dirty water still inside. Regular robot mop maintenance is what separates a genuinely clean floor from a machine that simply moves grime around. The good news: most problems take minutes to prevent and do not require technical skills.
Your robot mop handles a tough job. It picks up fine dust, pet hair, food crumbs, dried spills, and whatever gets tracked in from outdoors. If those residues stay inside the pads, tank, brushes, or sensors, cleaning performance drops quickly. A simple routine protects your appliance, keeps floors fresher, and helps you avoid replacing parts before their time.
Robot Mop Maintenance Starts After Every Run
The water tank and mop pad deserve attention after each cleaning cycle, especially in kitchens, entryways, homes with pets, or high-traffic areas. Leaving used water in the tank gives bacteria and mildew a place to grow. That is often the source of the sour, musty smell people notice when they start the next cleaning session.
Empty the dirty-water tank completely, then rinse it with clean water. If your model uses a separate clean-water tank, refill it only when you are ready for the next run. Standing water can develop odor, mineral buildup, or slimy residue that may block internal channels.
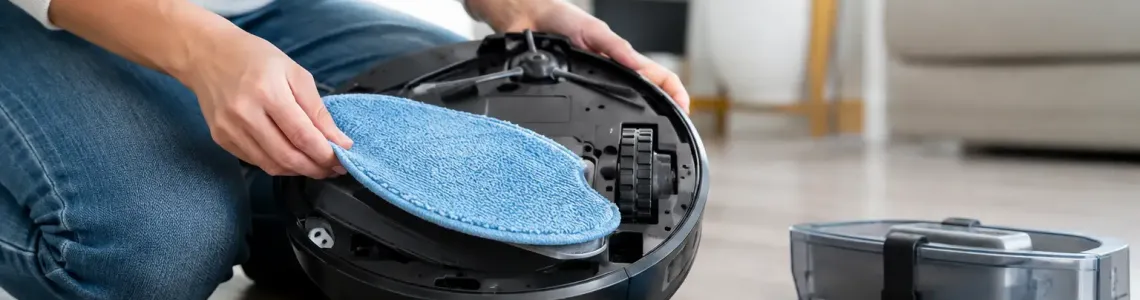
Remove the mop pads and rinse them thoroughly under running water. Work loose dirt out with your fingers before washing them. If the pads are machine washable, follow the manufacturer’s care instructions and let them dry fully before reinstalling. A pad that looks clean but still feels stiff or greasy can leave streaks across tile, vinyl, laminate, or sealed wood.
For homes dealing with muddy paw prints, cooking splatter, or sticky spills, keep a spare set of pads ready. One set can dry while the other is working. This small switch makes it easier to clean consistently without putting a damp, odor-prone pad back on the machine.
Use the Right Water and Cleaning Solution
More detergent does not mean cleaner floors. In fact, overusing cleaning solution can create excess foam, leave a tacky film, clog water outlets, and confuse sensors in some robot mop models. Never pour household dish soap, bleach, vinegar, or a random floor cleaner into the tank unless the appliance manufacturer specifically says it is safe.
Use plain water if that is what your robot mop manual recommends. If your model supports detergent, choose a compatible robotic-cleaner detergent and use the exact dilution stated on the bottle or in the manual. A concentrated formula is useful because you need only a small amount per tank, but measuring matters.
Hard water can also leave mineral deposits in the tank, spray nozzles, and mop-washing system. If you notice reduced water flow, white residue, or inconsistent wetting, check whether your manufacturer permits filtered or distilled water. The right choice depends on your model, so do not assume every robot mop has the same water requirements.
Clean the Parts That Collect Hair and Dust
A robot mop does more than mop. Most models vacuum, sweep, navigate, dock, and sometimes wash their own pads. That means hair and dust can collect in several places long before you notice a performance problem.
Check the main brush, side brush, wheel wells, caster wheel, and intake opening at least once a week. Pet hair is especially likely to wrap tightly around brush ends and wheel axles. When wheels cannot turn freely, the robot may miss areas, travel in circles, or struggle to climb small thresholds.
Use the cleaning tool that came with the robot if available. Cut or pull away wrapped hair carefully without damaging bristles or rubber fins. Wipe dust from the charging contacts on both the robot and dock using a dry, soft cloth. Dirty contacts can cause slow charging, failed docking, or a robot that stops partway through a job.
If your unit has a dustbin, empty it frequently rather than waiting until it is packed. Fine powder from floors, litter areas, and entryways can compact inside the bin and reduce suction. Washable bins should be fully dry before going back into the robot. Moisture near filters or electrical areas can create bigger problems than a full bin.
Do Not Forget the Filter
Filters quietly affect how well your robot performs. A clogged filter reduces airflow, makes the motor work harder, and can leave debris behind even when the bin is empty. Tap loose dust from the filter weekly or as directed by the manufacturer.
Only rinse a filter if it is labeled washable. If you rinse it, allow at least 24 hours of drying time before reinstalling it. Putting a damp filter back into the robot can lead to odor, restricted airflow, or motor damage. Replace filters when they remain discolored, warped, or clogged after cleaning.
Keep Sensors and the Dock Clear
Robot mops rely on sensors to avoid walls, stairs, furniture, cords, and pet bowls. Smudged sensors can make a smart cleaner behave like it has lost its way. Wipe the cliff sensors, front bumper area, camera lens, laser cover, and underside sensors with a clean microfiber cloth once a week.
Avoid spraying cleaner directly onto the robot. Spray the cloth lightly if needed, then wipe the surface. Liquid can seep into seams and damage components that are not designed for washing.
The dock needs maintenance too. Keep its surrounding area clear so the robot has a straight path home. If your docking station washes and dries mop pads, remove debris from the wash tray and drain area regularly. Hair, sand, and tiny food particles can block the drainage path and leave the dock smelling worse than the floor.
A self-cleaning dock reduces hands-on work, but it does not eliminate cleaning. Think of it as a helper, not a replacement for basic care. The more often you clean the tray and empty dirty water, the better the automatic washing system can do its job.
Build a Schedule You Can Actually Follow
The best maintenance schedule is one that fits your household. A quiet apartment with no pets may need less attention than a busy home with children, shedding dogs, and daily kitchen traffic. Start with a practical baseline and adjust when you see dirty pads, weaker pickup, or odors.
- After every run: Empty dirty water, rinse tanks, clean or swap mop pads, and remove obvious debris.
- Weekly: Clean brushes, wheels, sensors, charging contacts, dustbin, and dock tray.
- Monthly: Inspect filters, water outlets, pad holders, and brush wear. Deep-clean the dock and check for mineral buildup.
- Every few months: Replace worn pads, filters, side brushes, or main brushes based on use and your model’s recommendations.
If your robot mop runs every day, increase the frequency. A machine cleaning a home with pets may need brush checks several times a week. Waiting for an error message is not a maintenance plan - it usually means buildup has already affected performance.
Fix Common Robot Mop Problems Before They Get Worse
Streaks usually point to overloaded or dirty pads, too much detergent, or a floor that needs vacuuming before mopping. Start with freshly washed pads and the proper solution amount. For greasy kitchen floors, a quick manual spot clean may still be necessary before sending the robot over the area.
Bad odors usually come from old dirty water, damp pads, or a neglected dock tray. Empty and rinse every washable component, dry what can be dried, and run a cleaning cycle according to your machine’s instructions. Do not mask the smell with extra fragrance or detergent. Remove the source instead.
Poor water flow can be caused by an empty tank, a blocked outlet, mineral buildup, or an incorrectly seated tank. Check the basics first. If the tank and nozzles look clean but the issue continues, consult the manufacturer’s troubleshooting guidance before poking sharp objects into water ports.
When the robot misses rooms or gets stuck more often, inspect its sensors, wheels, brushes, and map settings. Rearranged furniture, dark rugs, cables, and clutter can all change how it navigates. A clean machine still needs a floor it can travel safely.
Treat your robot mop like the time-saving tool it is: give it clean water, clean pads, and a few minutes of care after use. That small habit keeps the next pass fresher, quieter, and far more likely to leave the floor looking like it was actually cleaned.
Related Products
